
Before you start building your new PC, it’s important to understand your PC’s motherboard layout and where each component connects. Trust me, planning first will save you time later. Once you mount your motherboard in the case, it’s time to start building that new PC!
If this is your first time, the maze of component slots and tiny connections may seem confusing, but don’t worry—we’re here to help you understand everything.
Plus, when you’re finished, you’ll better understand how everything works and where everything goes.
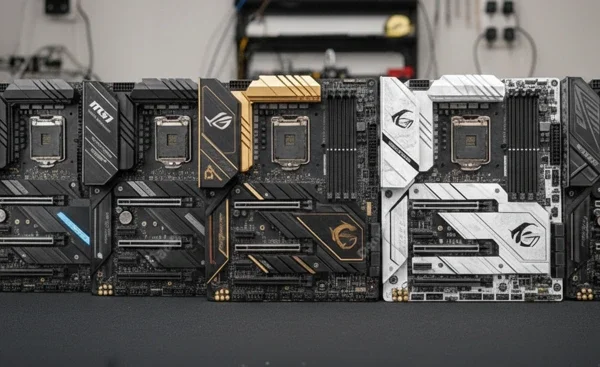
Every motherboard layout will differ, but most include all the connections we cover in this article.
So, let’s review the main parts of a motherboard and what each connection is for.
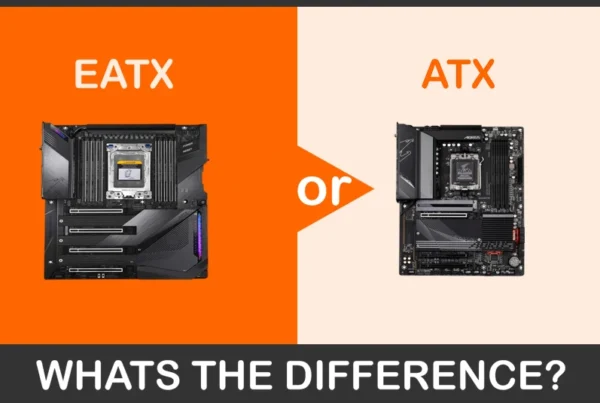
Here we’ll look at the standard ATX motherboard form factor.
Key Takeaways: Understanding a PC Motherboard Layout
After reading this article, you’ll understand the layout of your PC motherboard and all of its essential parts and connections.
Along with providing a brief overview of each, we also highlight the following items to keep in mind when building or upgrading your computer.
Quick Tips:
- RAM: Opt for a dual-channel random access memory (RAM) configuration for better performance.
- Storage: M.2 SSDs are generally faster than SATA SSDs, but SATA drives offer larger capacities at lower costs.
- GPU: Your graphics video card performs best when installed in the top-most PCIe x16 expansion slot.
- Cooling: Proper fan setup is essential for maintaining optimal system performance.
- Motherboard Compatibility: Make sure the motherboard supports your CPU, RAM, and other components.
These are just a few quick tips to get the best performance out of your PC.
(1) CPU Socket
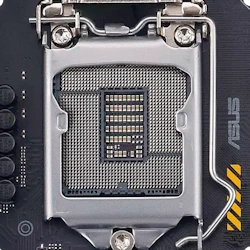 Let’s start with the CPU socket. Your computer’s brain, the central processing unit (CPU), lives in this socket. Now, this isn’t a one-size-fits-all. Each motherboard supports a range of CPUs from a specific manufacturer, with Intel and AMD being the most common.
Intel motherboards use an alphanumeric part-number schema.
You’ll see part numbers like Z790, B760, and H610, where the first letter indicates the supported chipset and features.
For instance:
- Z: High-end overclocking support
- B: Mainstream, no overclocking
- H: Budget-friendly, no overclocking
The numbers following indicate the chipset generation. The higher the number, the more current-generation CPUs it supports.
AMD motherboards also use an alphanumeric part-number schema.
You’ll see part numbers like X670E, B550, and A520, and like Intel, the first letter defines the supported chipset and features.
For Instance:
- X: High-end overclocking support (similar to Intel’s Z)
- B: Mainstream, often with overclocking support (similar to Intel’s B)
- A: Budget-friendly, no overclocking (similar to Intel’s H)
Like Intel, the number indicates the chipset generation, with higher numbers supporting newer CPUs.
So, make sure you pick a motherboard that matches the CPU (central processing unit) you want to use.
(2) RAM Slots
 Next, we have the RAM (random access memory) slots. These are the long, thin memory slots where your computer’s memory sticks go. RAM is like your computer’s short-term memory that handles multiple tasks at the same time. Yep, I can walk and chew gum at the same time!
More RAM means smoother multitasking, but don’t go overboard. Memory requirements depend on how you use your PC.
Here are some basic guidelines:
- 16GB – This is more than enough for basic office-type use
- 32GB – If you’re a PC gamer, this is the amount you’ll need.
- 64GB and up – If you’re a content creator using graphic design and video editing apps, this amount will make your design life much easier.
When buying RAM, you always want to install two memory modules. For example, if you need 16GB of RAM. Purchase a 16GB memory kit that includes 2-8GB modules.
This configuration is called a Dual Channel and is essential for performance, especially for gaming and content creation.
Also, follow the recommendations in your motherboard manual for installing your memory sticks in the proper memory slots.
PC RAM technology is in a transitional stage, so make sure your motherboard supports your RAM choice. Think DDR4 vs DDR5.
(3) PCIe x16 Slot
 Now, let’s talk about the PCIe x16 slot. This slot is the high-speed slot for installing your GPU (graphics card).
While there are many standard form factors, from Mini ITX to full-sized ATX, most full-size ATX motherboards include 2 or 3 expansion slots, mainly for graphics cards. So, you may be asking, “Which slot should I install my GPU?”
On most PC motherboards, this is the topmost slot closest to the CPU. Installing your GPU (graphics card) here will fully utilize all 16 PCIe lanes. This is why it’s called the “x16” slot.
The other full-sized slots often share PCIe lanes with other devices. This shared configuration can vary between different motherboards, so always check first.
However, installing a second GPU (graphics card) in these expansion slots is okay. While the PCIe data lanes are shared, the difference in video card performance is hardly noticeable.
However, a simple rule is that if you use only one GPU, install it in the top expansion slot for optimal performance.
(4) PCI x1 Slot
 The PCI x1 slots are the little siblings of the PCIe x16. They’re used for small add-on cards that enhance your PC’s functionality. For example, you can install a dedicated sound card with more audio channels or a faster network card if your motherboard only offers the basic 1GB Ethernet connection.
If you’re into streaming or gaming, you can add a capture card for those gameplay moments you want to share with friends or followers.
There can be three (3) or more of these small x1 slots on some larger motherboards, and while it’s likely you’ll never need all of them, it’s nice to have them available if your needs change.
(5) M.2 Connector
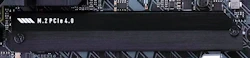 The M.2 connector is a relatively new expansion option on the motherboard. As PC technology advances, so does the ease of building a PC. In the PC technology “before times,” around 2015, M.2 (SSD) solid-state drive became the primary storage type for new PC builds.
This small slot on modern motherboards lets you install M.2 SSDs directly, without needing a power supply or data cables.
It’s one more step towards a wireless revolution!
These solid-state drives are high-speed storage devices, so if you want your computer to boot up in seconds, this is the connector you’ll likely use!
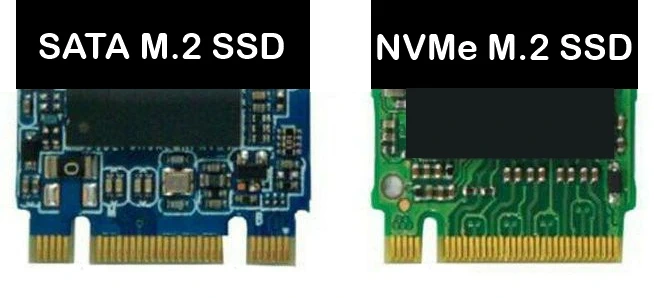 However, it’s important to know that there are two types of M.2 SSD.
- The “SATA M.2 SSD” (2 notches)
- The “NVMe M.2 SSD” (1 notch)
A SATA M.2 SSD will fit in an NVMe M.2 slot and may work depending on the motherboard.
However, an NVMe M.2 will not fit in a SATA M.2 slot.
SATA M.2 SSDs (solid-state drives) are still available, but you’re better off with the more widely supported and faster NVMe M.2 SSDs.
(6) SATA Ports
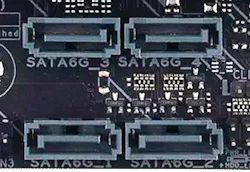
Speaking of storage devices, let’s not forget about the SATA ports. These are the wired data connectors for older mechanical hard drives and traditional SSDs.
Separate SATA power connectors are also required to power these SATA devices, such as hard drives, SSDs, and optical drives.
A total of four (4) ports is typical on most PC motherboards. SATA-supported hard drives are still in use. While these are not as fast as the latest NVMe M.2 storage drives, they are more affordable in larger storage capacities.
This option makes an older SATA hard drive an affordable way to add extra storage to a PC without breaking the bank.
Quick Tip: SATA ports use PCIe lanes. So, if you’re not planning to use the SATA ports, I recommend disabling them in your system BIOS as some motherboards are configured to share these resources with the on-board M.2 slots and can reduce read/write speeds by up to 50%.
(7) Front Panel Connectors
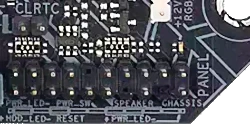 These tiny connectors power all the buttons and lights on the front of your computer case.
The power button, reset button, and LED lights for power and hard drive storage activity (although “hard drive” is an antiquated term by today’s standards) connect here.
Unfortunately, there is no standard for how these connect. Also, while many motherboard manufacturers use the same pin configuration, you’ll need to check the manual to confirm what connector goes where.
Depending on the case you’re using, these can be difficult to connect. They must be connected correctly to have front-panel control of your computer.
Although most modern cases provide this as a single connector, making these connections much easier.
(8) USB Headers
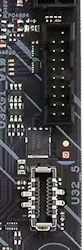
You’ll find a few different types of USB headers on your motherboard. USB headers connect to external USB ports for peripherals such as keyboards, mice, and external storage devices.
Here are some USB headers by Gen Type
- (8.1) USB 2.0 headers
- (8.2) USB 3.2 Gen 1 front panel connector
- (8.3) USB 3.2 Gen 1 header
This list is just an example of USB headers available on this specific motherboard.
Other motherboards may offer different options and Gen types depending on their age. Also, each Gen Type offers various speeds and capabilities for connecting your USB devices.
Faster headers mean quicker data transfers, so it’s worth paying attention to when buying a motherboard.
If you ever find you’ve run out of USB ports, you can buy an external USB hub to expand them. Windows can theoretically support up to 127 USB-connected devices, but you’ll likely never hit this limit.
However, if you’re tempted to try…please send me a photo!
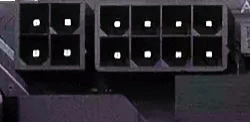
(9) ATX Power Connector
 The ATX power connector is where your power supply plugs into the motherboard. It’s the largest cable from your PC power supply, supplying the main power to your entire system.
This power connector cable may be hardwired on some modular power supplies, as it’s required and used in every PC build.
It will be the largest power connector on the motherboard, with modern motherboards having a 24-pin connector. The 24-pin ATX connector supplies power to multiple motherboard components.
The motherboard side of this power supply cable will be split into two separate connectors. This connector can vary, with the 20+4-pin dual connector being the most common.
This dual connector provides backward compatibility with older motherboards that use a 20-pin ATX power connector.
While this connection has been the standard since 1995, power requirements have increased, making it necessary to include a second power supply connector to accommodate the extra power.
(10) CPU Power Connector
In addition to the ATX power connector, there’s a separate CPU power connector. A modern power supply unit (PSU) will include these, as modern CPUs demand more power.
Depending on which CPU your motherboard supports, you’ll have either one or two 8-pin connectors, or a combination of an 8-pin and a 4-pin connector. The CPU power connector must be used to supply power to the CPU.
These separate power connectors accommodate more power-hungry CPUs that support overclocking and are usually located at the top edge of a typical PC motherboard layout.
If you’re like me, you’re old enough to have built PCs back in the day. You probably didn’t have a dedicated power connector for the CPU, so keep this in mind if it’s been a while.
I say this because I’ve built hundreds of PCs since the early 90s, so I’m not one to reach for the manual.
To make a long story short, the first PC I built with dedicated CPU power didn’t turn on the first time because I didn’t know I needed to make this power connection.
(11) CMOS Battery
 The CMOS battery might be small, but it has an important job by maintaining the system clock and preventing your BIOS settings from being reset when you turn off your PC. A top-end motherboard likely includes a BIOS reset button on the backplane with all the motherboard’s external connections.
However, if you have an older motherboard and need to reset the BIOS, there will be a jumper or switch to clear it.
However, as a last resort, you can remove the CMOS battery, wait a few seconds, then reinstall it to reset it.
Fun Fact: In the early days of PC building, this battery was often barrel-shaped and soldered onto the motherboard and a rechargeable Ni-Cd cell.
(12) Fan Headers
 Keeping your computer system cool is important if you want it to run at peak performance. This is where your PC fans come in.
Your PC knows how hot it’s running, so by connecting your fans to these fan headers, your system can automatically monitor and control fan speed to keep everything at a safe temperature.
This automation makes the CPU fan connector an important connection option on the motherboard, allowing the fan speed to be adjusted based on CPU temperature.
These settings are in your PC BIOS. By setting this “Fan curve,” you configure the fans to run faster as temperatures rise.
Don’t worry; it’s not difficult to set up. Plus, most motherboard BIOS settings provide default options that will work for everyone.
However, it’s possible to connect case fans using a fan hub that may not support connection to the motherboard fan headers. These may have a manual fan-speed controller, such as a wireless remote.
While these work, they set your fans to a fixed speed that is not controlled by system temperature. If this is your only option, it’s okay, but not ideal.
Overheating is bad for performance and hard on PC components, so make sure your fans are connected properly.
(13) Front Panel Header
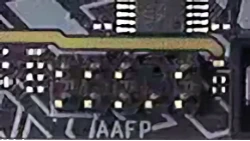 The front panel header is another set of pins that handles front-panel connections, such as audio jacks and USB ports. It’s separate from the front panel connectors we mentioned earlier, but just as important for making sure everything works smoothly.
As we said before, every case is different and may or may not need all these connections. Your case manual will show you what’s available to connect.
(14) COM/Serial Header
 This one’s a bit old-school. The COM/Serial header connects serial devices, which aren’t very common nowadays.
Nowadays, these are often used by older specialty printers and specialized industrial equipment, which tend to have very long service lives.
However, if you’re using specialized equipment that still uses a serial connection, this is included for backward compatibility.
(15) Thunderbolt Header
 A Thunderbolt header connects Thunderbolt-compatible devices to your motherboard. Thunderbolt provides lightning-fast data transfer rates and expanded connectivity options.
This connection option has been around since 2015, but only became mainstream in 2018 with the release of Thunderbolt 3. We now have Thunderbolt supporting 4K displays, and Thunderbolt 5 is 2-3 times faster.
This technology supports multiple devices through a single cable, enabling you to connect everything from external storage solutions to high-resolution monitors.
When shopping for a motherboard, consider one that supports Thunderbolt to future-proof your setup and make the most of high-speed peripherals.
(16) RGB Header
 While RGB isn’t for everyone, I like my gaming rigs with some RGB lighting. The RGB header lets you connect supported RGB devices, such as lighting strips, and control them through your motherboard.
There are some advantages to RGB. I use mine mainly as a temperature indicator. As my PC temps rise, I set my RGB lights to shift from Green to Red. (If supported)
So, how do I do that? Well, it depends on the app used to control your RGB devices.
Unfortunately, there are no standards for RGB connector types or configuration apps. This lack of universal support means you may need to use several apps depending on which RGB-supported components are installed on your PC.
Here are the most common RGB connector types:
- 3-pin ARGB: This is one of the more common types, offering more control over individual LEDs than traditional RGB.
- 4-pin ARGB: A newer standard that provides even more advanced control and features.
- Proprietary connectors: Many manufacturers use proprietary connectors for RGB components, limiting compatibility to their ecosystems. These usually include a control hub that may or may not support an RGB header connection to your motherboard.
Now, there are too many different apps to mention. Just keep in mind that each manufacturer will have its own proprietary configuration utility for its RGB-supported products.
However, if you use Windows 11, it now includes a feature called “Dynamic Lighting” that should support many RGB settings out of the box.
(17) Rear Panel Ports
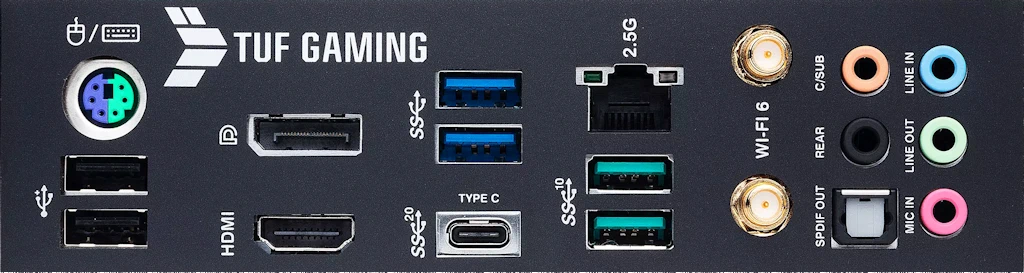
Finally, we have the rear panel ports. These are the connectors on the back of your motherboard for devices like your keyboard, mouse, monitor, network cable, speakers, and other USB devices.
Understanding the various motherboard connectors is important so you can determine whether there are enough connectors to connect components such as fans, USB devices, and RGB lighting.
Except for the front-panel connections, these are the I/O ports to which all your external peripherals connect.
When choosing a motherboard, make sure it includes the connection types and quantities you need.
TPM Header (Not Shown)
Okay, there’s one more that might be there on some older motherboards.
The TPM header is used to connect a Trusted Platform Module, which adds extra security features to your system. If security is your top priority, this is something to consider.
However, newer motherboards often have a built-in TPM chip (Firmware TPM or fTPM), eliminating the need for a separate module.
Frequently Asked Questions
Which expansion slot should I use for my graphics card to get the best performance?
For optimal performance, you should install your GPU in the top-most PCIe x16 slot closest to the CPU. This ensures the card uses all 16 PCIe lanes, whereas other slots often share lanes with other devices, potentially reducing bandwidth.
What is the difference between the two types of M.2 SSDs?
There are two main types: SATA M.2 (which has two notches) and NVMe M.2 (which has one notch). NVMe drives are significantly faster and more widely supported in modern builds. While a SATA M.2 may fit into an NVMe slot, depending on the motherboard, an NVMe drive will not fit into a dedicated SATA M.2 slot.
How much RAM do I need, and how should I install it?
Memory requirements depend on usage. Use 16GB for basic office work, 32GB for gaming, and 64GB or more for content creation. For the best performance, you should install two matching modules to enable Dual Channel mode rather than using a single stick of RAM.
Why does my motherboard have two different power connectors?
Modern motherboards require two separate power sources from the PSU: the 24-pin ATX connector, which provides the main power to the entire system, and a dedicated CPU power connector (usually 4-pin or 8-pin) to meet the high power demands of modern processors.
What is the purpose of the CMOS battery on the motherboard?
The CMOS battery is a small coin-cell battery that maintains the system clock and preserves your BIOS settings when the computer is powered off. If the battery is removed or fails, these settings will reset to their factory defaults.
Final Thoughts on PC Motherboard Layout
And there you have it! A quick tour of a current PC motherboard and connections.
Of course, this article is a quick overview of the standard connections found on most newer motherboards.
Understanding is the first step in planning a PC build or upgrade.
Knowing the PC motherboard layout is a good starting point for choosing the components you need for your PC build.
Also, consider the motherboard size you’ll need. Smaller form factors will have fewer expansion options, among other things.
Plus, having this basic understanding will make it easier to choose and assemble your first PC.
Whether you already have a PC or are planning to build one. I hope you learned something new about PC motherboards.
Hopefully, the next time you look at one, you’ll know what all those connections are for.
The detailed image with the labeled components was helpful. Although my motherboard is an MSI, many were in the same place. I’m looking to upgrade, do you have any recommendations for specific motherboards?
I’m glad you found my article helpful! When it comes to choosing a motherboard, there are soooo many choices I wouldn’t know where to start in making a suggestion. Factors like use case, CPU support and upgradability are just a few considerations. However, If you’re looking for the latest Intel motherboards, this is a good video from a trusted YouTube channel, “Hardware Unboxed.”
https://youtu.be/GxzMtPmjG_M?si=oJbsyx9oBwPv_k1G
If not, I’m sure they have other helpful videos on other CPU platforms. Hope this helps!
I’m building my first PC and I’m sure I’ll make some mistakes but this blog was very helpful. I didn’t realize that I could connect my fans to those fan headers so the motherboard can control their speed based on temps. I was going to connect them to control using the remote controller that came with them. I’m sure connecting them to the motherboard is the better option.
Almost all case fans connect using some sort of “Fan Hub” that should then have a connection to the motherboard. Unfortunately, not all support this. It’s mostly the low-cost, no-name brands that may not support this.
This was helpful! I know I need to fill a full memory bank, but should I try and fill both memory banks and would it make a difference?
There’s a lot of opinions on this. So here’s mine. 🙂 If you have or are building a gaming PC, the most you’ll need today is 32GB of RAM, as today’s modern AAA games do not require more than that. However, if you’re a content creator and do a lot of graphic design and video editing, then 64GB is justified.
In my systems, I only fill the 1st bank with 32GB on my gaming PCs and 64GB on my graphic workstation for dual-channel mode. I like to keep the second bank free to upgrade if I should ever need to. But if you fill both banks (all four slots), then you would have to remove and replace RAM to upgrade, plus there is no noticeable difference in filling all the slots.
But never install just a single RAM stick. It will work, but you will not benefit from Dual-channel performance, and if you’re a gamer, you’ll see a significant negative impact on performance.
I just bought a new PC and it only had one memory stick, not the two that you suggest. Does it make a big difference where I should add another one?
It depends on how you use your computer. If you’re using mostly Office applications and browsing the web, you’ll likely not notice the difference. However, if you’re a PC gamer or use memory-intensive apps like graphics and video editing, I would install a second RAM stick. And, if possible the same as the one you already have.
This was helpful! I have a smaller build and my motherboard has only 2 RAM slots. If anyone else is only running with a 2 slot motherboard, I have both filled which is what the manual recommended. 🙂
I never realized there was more than one type of M.2 drive (SATA vs NVMe notches, who knew?!). I also didn’t know that the top PCIe slot is where you should install the GPU. I always assumed the full length slots were all the same. I learned something new today. Thanks!
I’m glad you found this helpful! Also, SATA performance is much faster than a mechanical hard drive, but much slower than an NVMe drive. You’ll almost never see a modern motherboard with a SATA M.2 connection option.
“Nice article! What are your thoughts on the future of motherboard form factors? Do you think we’ll see any future standards?
There are a few outliers outside the standard sizes. I don’t see these changing anytime soon unless it’s out of necessity. However, improvements are being introduced, such as moving connectors to the backside of the motherboard for a cleaner-looking installation.
One I found helpful in a new build I just did was a quick release button for the top PCIe GPU slot. This makes it so much easier and safer to remove the installed graphics card.
I almost never post comments but I found this information very helpful. I never realized there was so much to consider when choosing a motherboard. I’m about to build my first PC and I’m sure I’ll make some mistakes but I just want to learn how to build a PC myself.
Thanks! I’m always glad to hear that one of my posts was helpful to someone. I love building PC’s. It’s a fun way to learn about how everything works together. Plus, the satisfaction you get when you power up your new PC for the first time!
This was a very helpful article! I’m building my first PC and the motherboard has 3 SSD slots. Does it matter which one I install my SSD drive into?
Often, this will depend on your motherboard. If you have a manual for it or can find it online, it’s always best to follow their recommendation. However, in most cases it’s best to install it on the first m.2 slot. It should be labeled something like “M2_1” or similar.
Now here’s the reason “why”. The first slot typically connects directly to your CPU’s available PCIe lanes, which is the fastest connection performance-wise. The other m.2 slots connect through the motherboard’s chipset and may be shared with other PCIe devices like your GPU (Graphics Card) if you’re using one.
However, it’s always best to confirm what your motherboard supports by checking the manual.