Yes! Even with today’s high Memory and Storage costs, you can still build a decent Gaming PC on a budget by focusing on 1080p gaming.
Building a high-end gaming PC today using the latest tech (i.e., DDR5 RAM, PCIe 5.0, etc.) means spending nearly $2000 or more. However, AMD’s mature AM4 platform still delivers exceptional price-to-performance. With last-gen GPUs still available, you can put together a capable 1080p gaming rig for around $1000 that still delivers a very good gaming experience.
This isn’t a one-size-fits-all guide, but an example of how to do it for around $1000.
While there are many alternatives to our AM4 example build below, we see this as a glimmer of hope that you can still build a decent Gaming PC if you’re willing to make some sacrifices.
We also include a step-by-step assembly walkthrough that will get you from box to boot screen without the guesswork. It’s not a screwdriver-turning guide, but an order of operations that shows how easy it can be to build your own PC.
Whether you’re a first-time builder or someone coming back to the hobby after a few years, this build hits the sweet spot between affordability and capability.
High Memory and Storage Costs Workarounds
Before you start filling up the shopping cart, it’s important to know where budget builds bleed unnecessary money—and where they don’t have to.
DDR4 vs. DDR5: Which RAM Should You Choose
DDR5 RAM (Intel 12th Gen and above with Z690/Z790 boards, or AMD’s AM5) is compelling on paper, but DDR5 kits still carry a price premium over DDR4. For a strictly 1080p-focused build where the GPU is the primary performance bottleneck, that premium doesn’t translate into equal gaming performance for the cost. Sticking with an AM4 or LGA1700 DDR4 platform frees up $40–$80 or more, which is far better spent elsewhere, such as on a faster GPU or a higher-wattage Power Supply Unit (PSU).
16GB (2x8GB): The Dual-Channel RAM Sweet Spot
When choosing RAM for a budget build, 16GB of DDR4 in a 2x8GB dual-channel configuration is still a strong choice for a 1080p gaming build. Running two sticks instead of one will physically double your memory controller’s bandwidth, improving GPU-dependent performance and reducing CPU bottlenecking in dual-core-sensitive gaming titles. DDR4-3200 CL16 hits the best cost-per-performance ratio. Anything faster will offer diminishing returns beyond DDR4-3600 on the AMD platform.
DRAM-Less PCIe 4.0 NVMe SSDs vs. PCIe 5.0
PCIe 5.0 NVMe drives are genuinely impressive—and really unnecessary for a budget gaming PC. The sequential speed improvements over PCIe 4.0 don’t translate into meaningfully faster load times in gaming.
Game engines are largely limited to decompression and asset streaming, not raw sequential throughput… (a little geek speak!). A non-cached PCIe 4.0 NVMe like the TeamGroup MP44L delivers more than adequate real-world performance at roughly half the price of a DRAM-cached PCIe 4.0 drive and a fraction of the cost of their PCIe 5.0 alternatives.
A sub-$1000 PC Component Parts List
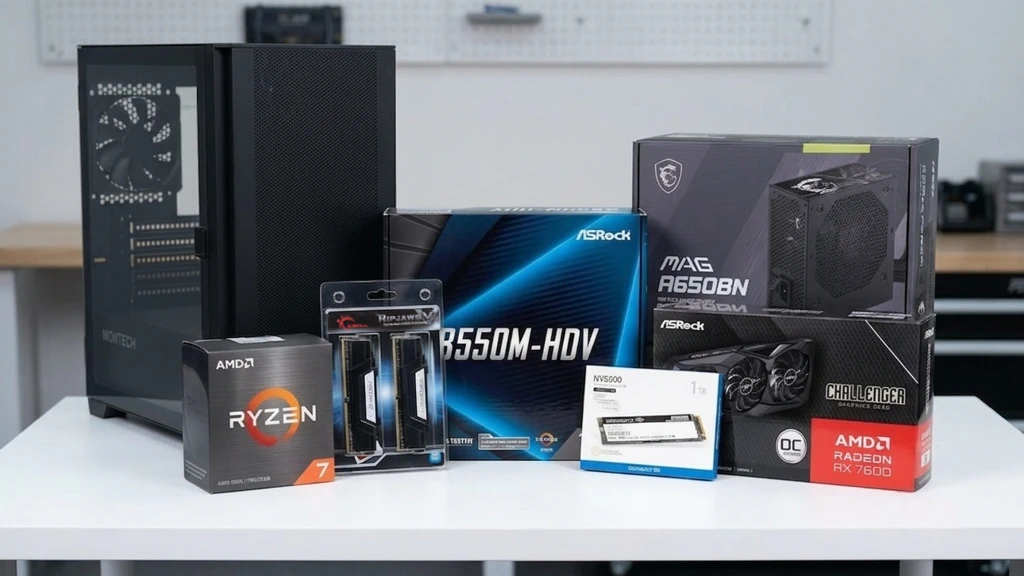
Here’s the full PC parts list for this build, optimized for 1080p gaming performance per dollar:
| Component | Part | Approx. Price |
| CPU | AMD Ryzen 7 5700 | $150–$160 |
| GPU | AMD Radeon RX 7600 8GB | $280–$300 |
| Motherboard | ASRock B550M-HDV (AM4) | $70–$80 |
| RAM | G.Skill Ripjaws V 16GB (2x8GB) DDR4-3200 CL16 | $120–$150 |
| Storage | 1TB TeamGroup NV5000 PCIe 4.0 NVMe SSD | $155–$165 |
| PSU | MSI MAG A650BN 650W 80+ Bronze (ATX3.1) | $60–$70 |
| Case | Montech AIR 100 | $60–$70 |
| Total | ~$895–$995 |
Quick Note: The ASRock B550M-HDV is a micro-ATX board that keeps costs down without sacrificing essential connectivity—it supports PCIe 4.0 on the primary slot and offers a clean VRM for stock operation.
Gaming Performance: What 60–120 FPS Looks Like
Component specs are only half the story. Here’s what this build actually delivers in the games people are playing right now.
Esports and Competitive Shooters
This is where the RX 7600 genuinely shines.
- Valorant / CS2 (High Settings): 180 – 250+ FPS
- Fortnite (Competitive/Medium Settings): 120 – 140 FPS
- Apex Legends (Medium Settings): 110 – 130 FPS
- Call of Duty: Warzone (Basic/Recommended + FSR): 85 – 110 FPS
The RX 7600 with 8GB of GDDR6 is well-matched to the GPU demands of these engines, and the Ryzen 7 5700’s single-threaded performance will make sure the CPU is never the bottleneck.
AAA Single-Player Titles
For heavier titles, you can still get solid performance with a few considerations.
- GTA V (High Settings): 90+ FPS
- Helldivers 2 (Medium Settings): 60-75+ FPS
(This is a CPU-demanding game with occasional FPS dips depending on the scene) - Cyberpunk 2077 (Medium Settings): 65–80 FPS with RT off
(perfectly playable and visually impressive at these settings)
Enabling AMD’s FSR 2.0 (available natively in Cyberpunk and dozens of other titles) can push those numbers another 20–30% with minimal visual trade-off.
Note: Custom settings are a factor, so your performance may vary.
Building Your Gaming Rig: Step-by-Step
Building a PC is more straightforward than most first-time builders think. Take your time, work on a clean, non-static surface, and handle components by their edges. If you’re unsure of any of the steps below, follow the instructions provided with each component or check out a quick YouTube video on how it’s done. I’ll include a link below to help.
Step 1: Prep Your Motherboard and Workspace
Remove the ASRock B550M-HDV motherboard from its box and place it on the anti-static bag it shipped in. This keeps it protected while you install several components. Grab a Phillips-head screwdriver and a small bowl to hold the screws.
Step 2: Install the CPU into the AM4 Socket
Lift the ZIF (zero insertion force) lever on the AM4 socket. Align the gold triangle on the corner of the Ryzen 7 5700 CPU with the triangle marker on the socket, then lower the CPU straight down (no force required). Close the lever to lock it in place.
Step 3: Mount the M.2 NVMe SSD
Before installing the motherboard into the case, install the 1TB TeamGroup NV5000 PCIe 4.0 NVMe SSD M.2 drive into the primary M.2 slot located directly below the CPU socket on the motherboard. Angle the drive into the slot at roughly 30 degrees, press it flat, and secure it with the included M.2 screw.
Step 4: Install the Dual-Channel RAM
Check the motherboard manual for the correct dual-channel slots (typically slots 2 and 4, not 1 and 2). Open the retention clips, align the notch on your G.Skill RipjawsV DDR4 RAM sticks, and press firmly until both clips click. Seating RAM takes more force than you might expect, so apply equal pressure on each side.
Step 5: Mount the CPU Cooler
The Ryzen 7 5700 ships with the Wraith Spire cooler, which is more than adequate for this build in a well-ventilated case. If you use a third-party CPU cooler, apply a pea-sized dot of thermal paste to the center of the CPU. However, the stock cooler includes pre-applied paste, so skip this if you’re using the Wraith Spire cooler included with the CPU. Secure the cooler to the AM4 bracket using the included mounting hardware, tightening in a cross pattern to ensure even pressure.
Step 6: Install the PSU and I/O Shield
If your case doesn’t have a pre-installed I/O shield, press the motherboard’s I/O shield into the rear I/O cutout before anything else. Why, you ask? It’s easy to forget and difficult to install afterward. Mount the MSI MAG A650BN into the PSU bay (typically at the base of the case) and secure it with four screws.
Step 7: Mount the Board into the Case
Verify your standoffs are installed in positions that match the motherboard’s screw mounting holes (use all of them). Then lower the motherboard into the Montech AIR 100 case, align the rear I/O ports with the I/O shield, and secure it with the included motherboard screws. Don’t overtighten!
Step 8: Connect Internal Power Cables
Connect the 24-pin ATX power connector to the motherboard, the 8-pin (or 4+4-pin) EPS CPU power connector to the top-left of the board and route your SATA or additional power cables as needed. Keep cable routing clean so you don’t block airflow, plus… it looks nicer.
Step 9: Install the GPU
Remove the adjacent PCIe slot covers from the rear of the case. Seat the AMD Radeon RX 7600 into the primary PCIe x16 slot (the only full-sized slot on the motherboard), pressing firmly until the retention clip clicks. Secure the GPU bracket with two screws, then connect the 8-pin PCIe power connector from the PSU.
Step 10: First Boot and BIOS Configuration (XMP/DOCP)
Connect your monitor to the GPU’s HDMI or DisplayPort output (not the motherboard). Power on the system and tap Delete to enter the BIOS. Navigate to the OC Tweaker or memory settings section and enable AMD DOCP (the AM4 equivalent of Intel XMP). Select your DDR4-3200 profile and save. This step is critical: without DOCP enabled, your RAM defaults to DDR4-2133, leaving significant memory performance on the table.
Step 11: Install your Operating system
Most of you will likely install a version of Windows, but some might want to install Steam OS if this is a dedicated Steam gaming PC. Keep in mind that SteamOS only supports AMD GPUs natively, so if you choose Nvidia, SteamOS won’t work. You would have to use an alternative like Bazzite, which is a topic for its own article.
Otherwise, you could be brave enough to try Gaming on Linux (just kidding 😊). Since this guide is a general overview of building an affordable gaming PC, I recommend searching YouTube for quick instructions on how to install the operating system of your choice. There are TONS of video guides out there!
Here is a quick and easy-to-follow video on putting all the parts together to build your budget gaming PC. Now, my PC Parts List isn’t an absolute for a budget build. You can see in this video that they use alternate but equivalent components to keep costs low.
Getting the Best Bang for Your Buck
You can save even more on a budget build. Here are three worth considering when shopping for parts.
Take Advantage of CPU + Motherboard Bundles. For example, I have a Micro Center nearby, and their in-store CPU and motherboard combo discounts are among the best deals available. Pairing a Ryzen 7 5700 with a B550 board can shave $30–$50 off your total build cost. You can also find these bundles on Amazon and Newegg. Just know that they are designed to move slower-moving inventory, so the paired bundles change often.
Consider the Used Market for a GPU. You can often find many perfectly capable GPUs on Facebook Marketplace, eBay, and Amazon at prices well below MSRP. A lightly used GPU can save you money or allow you to get a better model for the same price as a lower-spec’d new one. Keep in mind that some heavily used crypto-mining cards are still out there, so stick to reputable retailers and, when possible, ask to see a video of the card running under load before purchasing.
Never Skip XMP/DOCP in BIOS. This is the most commonly skipped step in budget builds, and it’s a costly oversight (Even some pre-built system integrators (SI’s) forget to update this setting). DDR4-3200 RAM running at its default 2133 MHz speed will significantly bottleneck the Ryzen 7 5700. This is especially true in CPU-sensitive game titles. Enabling DOCP takes under two minutes and immediately unlocks the full bandwidth your RAM was rated for.
The Bottom Line
A sub-$1000 gaming PC that handles 1080p at 60–120+ FPS across both competitive and AAA titles isn’t as much of a compromise as you might think.
Is it the best choice of what’s available today? … No! But if you don’t already have a system and can’t wait for RAM and Storage pricing to come back to earth (this could take years), it’s a reasonable compromise to consider.
By staying on the AM4 platform (which is still quite capable today!), choosing a GPU that’s optimized for 1080p, and avoiding the premium tax on DDR5 and PCIe 5.0 storage, you land at a performance level that is still as capable as it was just a few years ago.