
Keeping your CPU and everything inside your PC running as cool as possible is more than simply about making sure your PC hardware lasts longer; it’s also about getting the best performance out of your system.
This matters even more if you’re a PC gamer. Playing any of the latest resource-demanding AAA titles can push both your CPU and GPU to their temperature limits.
In my flight sim rig, I can feel the heat the case fans push out. And while this heat isn’t wasted in the winter, it’s very unwelcome during these 100-degree summer days.
So, here are a few ways to keep your PC from overheating.
Key Takeaways:
Keeping your PC cool helps protect its components and helps it perform at its best.
Tips include:
-
Monitoring temperatures: Use software like HWMonitor to track CPU and other component temperatures.
-
Boosting airflow: make sure there is proper case airflow, clean dust filters, and consider adding extra fans.
-
Hardware upgrades: Upgrade CPU coolers (air or liquid) or build a custom water cooling loop for extreme cooling.
-
System optimization: Undervolt your CPU to reduce heat and potentially improve performance.
-
Laptop cooling: Use cooling pads, avoid soft surfaces, and keep vents clean.
Additional tips:
-
Move it: Move your PC to a ventilated area.
-
Close it: Close your PC case for better airflow. (It really does matter!)
-
Clean it: Regularly clean dust buildup inside your PC.
These tips will help you manage your PC’s temperature and prevent overheating.
How to Check Your PC Temperatures
The first step in solving any problem is knowing where to look. So, how do we find out what’s causing the rise in PC temperatures?
Also, how high is too high? Everyone uses their PC differently. General office use will generate less heat than, say, hardcore gaming. So it’s important to know whether you actually have an overheating issue.
However, if your PC overheats under the lightest use, you need to fix it right away!
Using software tools to measure PC temperatures
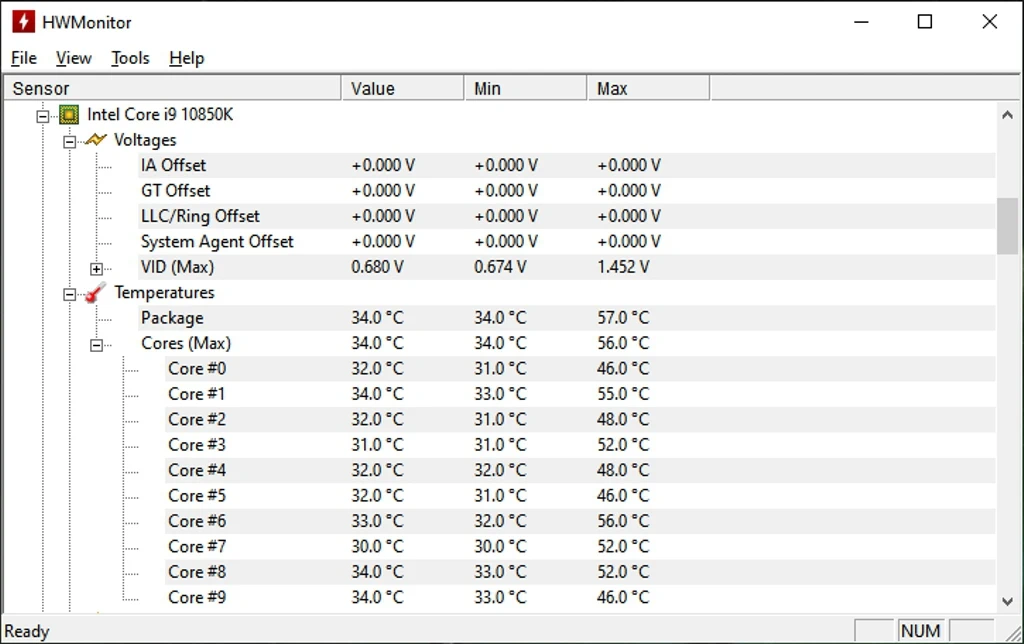
Several free software tools are available. My favorite is HWMonitor (Shown above).
This free utility gives you live data on your CPU temperature and almost every area of your PC with temperature and voltage sensors.
It’s like having a thermometer inside your computer, measuring everything in real-time.
Here is the link to the official website for this utility CPUID. Unfortunately, this site is full of “spammy” ads with fake “download” buttons linking to other sites.
So, here is the direct link to the “HWMonitor” download page to help you avoid these.
Check your computer BIOS for CPU temperature
Along with using a software utility like HWMonitor, you can also check your CPU temperature in your PC BIOS.
To open the system BIOS, just restart your PC and press the BIOS access key during startup. For most systems, this is the “DEL or F2 key. If those don’t work, check your system or motherboard manual for how to access the BIOS.
Once open, just navigate to the hardware monitoring section. This screen shows your CPU temp, fan speeds, and other real-time PC conditions.
While this might sound a little technical, it’s easier than you think!
Understanding the maximum temperature for a CPU
Every CPU has a maximum safe temperature. You’ll find this information in the manufacturer’s specifications for your specific CPU.
However, this highest-rated safe temperature limit for most modern CPUs is around 100°C.
If your PC reaches this limit, your CPU will “thermal throttle” to prevent it from going any higher. This protection prevents permanent damage to the processor cores.
A utility like HWMonitor will track this for you in real time. If your CPU regularly hits this high temperature, you have a problem that needs immediate attention!
Think of the maximum temperature limit as the redline of your car’s tachometer. You really don’t want the needle going into the red where things can break.
Quick Tip: Most modern PC BIOSs will alert on bootup if your CPU is overheating.
Things You Can Do Without Using Any Tools
Before you break out the screwdriver, let’s look at what you can do quickly and easily to help reduce your PC’s temperature.
Does moving your computer keep it cooler?
Moving your PC to a more ventilated area can help. Also, keep it off the carpet, since many power supplies draw air from the bottom of the case.
If you have to put it on a carpeted floor, put it on a hard surface like a board or find a monitor stand that it fits on and use that to keep the air vents clear.
Also, try to keep your PC out of direct sunlight and make sure all the fans have plenty of room to circulate fresh air.
I’m sure many reading this are old enough to remember when every PC desk had an allocated place for that boring beige tower PC.
Plus, many of these storage areas had a door on the front that you could close. Talk about solitary confinement!
To be fair, computers back then didn’t generate the heat they can today, so many would be fine tucked away like this. However, the more open the space, the better.
Now, I say this mainly for all you PC users out there who just built or bought a new PC and still have one of these old computer cubby desks.
If you care about your new PC purchase… “DON’T PUT YOUR PC IN THERE” if you want it to live!
Look at it like this. If you were your PC, where would you sit to feel cool and comfortable?
Friends don’t let friends cook their PCs!
Why cleaning your PC will help it run cooler
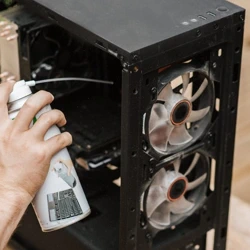
Next to a cup of coffee, dust is your PC’s worst enemy. You may not realize it, but computers are like magnets for dust.
It’s important to regularly clean the fan filters and the inside of your PC to prevent dust buildup.
Now, don’t grab a towel or dust rag and start wiping things down. Doing this can generate static electricity, which is bad for PC components.
Consider buying an electric air duster. It’s a good investment as you can use it to clean other parts like your keyboard. I even use mine to clean dust from my car vents.
Optionally, a standard can of compressed air can also do a pretty good job.
Ways to improve airflow so your PC will run cooler
If you bought a pre-built PC, we hope they did a good job with the cable management.
Why you ask?
Tucking away those cables helps keep them out of the way and improves airflow inside the case.
Plus, setting up the fans correctly can make a big difference. Of course, it all depends on your case design.
However, if you have front fans, configure them to draw cool air into the case. The top and rear fans should exhaust the hot air out of the case.
This fan configuration should create a smooth airflow path through your PC.
Although it’s important to consider all the different PC case options, I suggest searching online for advice. You’ll find some great YouTube videos on this topic.
Just search for something like “How to optimize your PC case airflow”.
Keep the case closed to improve airflow
Believe it or not, keeping your case closed can actually improve airflow. This lets airflow from the case fans follow a consistent path for more even cooling.
An open case prohibits this airflow and can lead to hotspots.
I learned this when I built a PC in an open-air case. I was like, “That looks cool,” so I went for it. Plus, I wanted a case I could mount to the wall.
However, I quickly needed to add more fans to clear out the heat generated by my GPU.
I know some out there will disagree and say open cases run cooler. And if they’re running a custom water-cooling loop, this may be true.
With the expectation of an AIO cooling the CPU, my open-air PC was cooled by fans. Plus, I ended up adding more to improve cooling.
Everyone’s build is different. Your PC should reflect your style.
Does undervolting my CPU help with temperatures?
It sure does and is recommended for gaming systems! By undervolting your CPU, you’re reducing the voltage supplied.
This change lowers the temperature by reducing power consumption. Okay, now you’re asking, doesn’t that make my CPU slower?
Not really, and it can actually increase performance since a cooler CPU will perform better.
There are a couple of ways to do this. First, you can change these settings under the system BIOS.
However, doing this means carefully adjusting these settings, so be sure you’re comfortable with advanced BIOS settings.
Alternatively, some utilities let you adjust voltage settings without entering the BIOS.
Here are two software utilities you can use based on whether you’re Team Intel or Team AMD.
-
Intel Extreme Tuning Utility (XTU): This utility is user-friendly for tuning Intel CPUs, allowing real-time performance monitoring, setting tweaks, and stress tests. It lets you adjust multipliers, voltage, and power limits directly from your desktop, making it available to everyone.
-
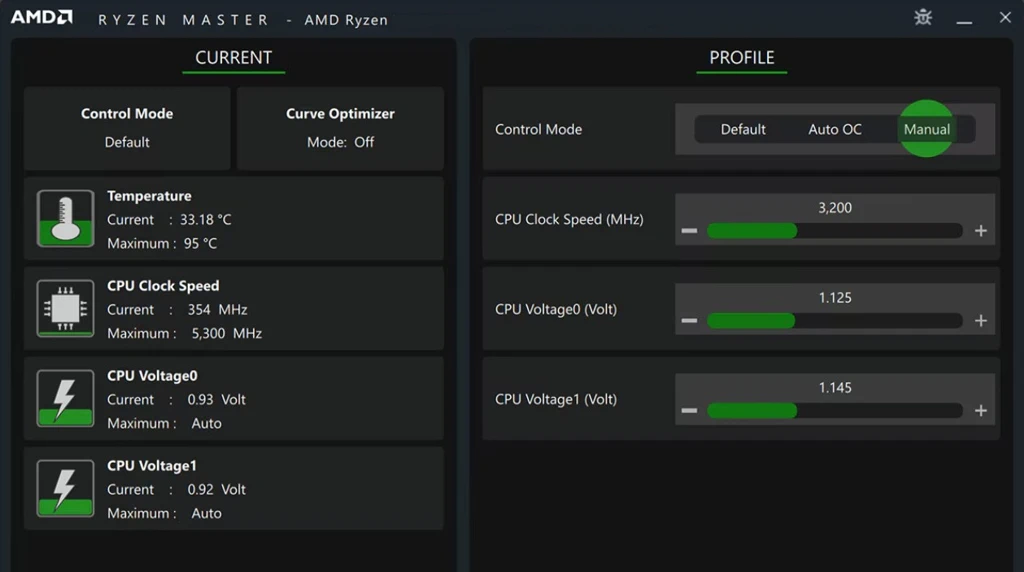
AMD Ryzen Master: This utility monitors and overclocks AMD Ryzen CPUs. Its simple-to-use interface lets you change clock speeds, adjust voltages, and access real-time performance monitoring. Ryzen Master allows users to configure different profiles, such as one for gaming or another for content creation. Plus, it includes visual performance graphs.
While each of these utilities provides a “friendly” user interface, it’s important to understand how to adjust CPU settings.
As with most things, many online tutorials cover these in detail.
Quick Tip: Don’t confuse Undervolting with Overclocking. They are two different approaches, and many PC users do both.
Grabbing a Screwdriver to Make Hardware Upgrades
If the toolless suggestions haven’t improved your PC temps, it’s time to take it to the next level and upgrade your cooling hardware.
The CPU and GPU need the most cooling. So, consider one of these options depending on where you see temperatures rising above normal.
However, before you buy new hardware to cool your CPU, you might try replacing the thermal paste between your existing CPU cooler and the CPU. It costs about ten (10) bucks for a small tube and is the most affordable upgrade you can do to keep your pc cool.
The same is true for graphics cards (GPUs), which also use thermal paste and pads to keep the GPU core processor cool. However, replacing the thermal paste on graphics cards will take a bit more effort.
This paste can break down over time, especially if your CPU runs hotter than normal and occasionally hits the 100-degree Celsius limit.
Upgrade the stock CPU cooling fan
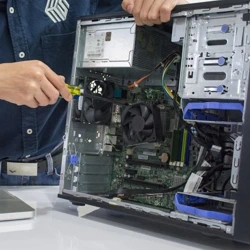
Some lower-end CPUs include a “Stock Cooler,” which provides cooling for basic PC use.
However, swapping it out for a more effective option will reduce temperatures considerably. To be honest, CPU cooling requirements for most CPUs require more than what you’ll get from a stock cooler.
Sometimes, I wonder why some CPU manufacturers still include a stock cooler. Since they struggle to keep the CPU cool under heavy workloads, they usually end up as unnecessary E-Waste.
Install a third-party air cooler
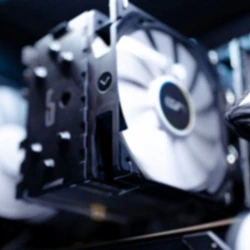
Third-party air coolers come in various sizes and performance levels. This type of cooler is usually much larger.
They’re generally more effective than stock coolers and usually include one or more fans.
However, be sure that the one you choose will fit inside your case.
Most users will find this type of cooler easier to install.
Install an AIO CPU water cooler
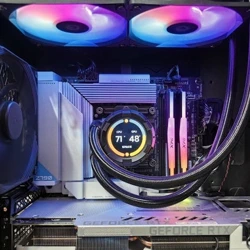
This option is my “go-to” CPU cooling solution. I use this type of cooling solution in all my high-end PCs.
An All-In-One (AIO) water cooler provides superior cooling over most air coolers. They may look complicated to install at first, but they are fairly easy to fit into a larger case.
Most case manuals will indicate where and what size AIO coolers will fit.
If you’re using a smaller case, your selection options will be limited, which is why these are available in three (3) standard sizes.
-
120mm (single fan radiator)
-
240mm (dual fan radiator)
-
360mm (triple fan radiator)
These are a great middle ground between air coolers and custom loops. Just be sure it’s powerful enough to cool your CPU.
Go big with a custom water-cooling loop
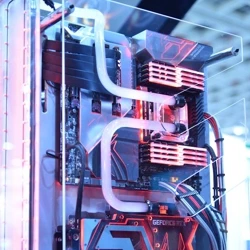
While I consider myself a geek among geeks, I’ve never built a PC with a custom water loop.
A custom water-cooling loop provides the best cooling performance and lets you cool several components at once.
The GPU and some High-Speed SSD storage devices are the most common components added to a custom water loop.
I’ve even seen water blocks designed to cool the system memory (RAM), but honestly, that is unnecessary and mostly for show.
However, there are some pros and cons to consider.
Pros:
-
Superior Cooling Performance: Custom loops can reach significantly lower temperatures than air cooling or AIO liquid coolers, especially when overclocking.
-
Customization: You have complete control over all components, from tubing, fittings, and coolant, to make your custom PC build original.
-
Aesthetics: Custom loops just look cool! Create a custom look based on the tubing, fittings, and lighting options you choose.
-
Scalability: You can add more than just the CPU to the cooling loop. Any component that supports a “water block,” such as a GPU or High-Speed SSD, can be integrated into the loop.
Cons:
-
Complexity and Time: Building a custom loop requires technical knowledge, time, and patience. Doing it wrong can lead to leaks or damage.
-
Cost: All these high-performance components, tubing, fittings, and coolant can add up quickly, making custom loops considerably more expensive than air cooling or AIOs.
-
Maintenance: Custom loops require regular maintenance, including coolant changes and cleaning to preserve performance.
-
Leak Risk: Because custom loops require many connections (fittings) to several devices, there’s always a risk of leaks, which can damage your PC components.
If you have several components to cool with the budget and skill to do so, this is the option to use. Otherwise, an AIO is the way to go if you just need to cool your CPU.
Do extra fans help cool a PC?
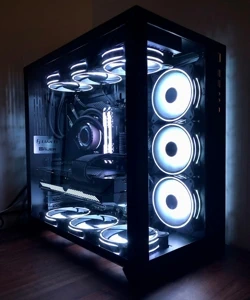
Adding extra fans can increase airflow and prevent hotspots. But more fans isn’t always better.
What matters most is where you install fans and how you configure them to pull air in and exhaust it out of your case.
Since there are so many case options, there is really no right or wrong answer to these questions.
All I can say is to be mindful of fan placement and try to balance the number of intake fans with exhaust fans so you maintain balanced pressure inside your PC case.
Think of it like this. You have two balloons; one is half-inflated, and the other is fully inflated. Then you connect each one to opposite ends of a straw.
The fully inflated balloon will equalize with the other by pushing air through the straw until they are both equally inflated. This balance represents the equalized pressure you want for your case’s airflow.
Install specialty cooling components
For those wanting to take their cooling systems to the extreme, many specialty cooling options exist for components including RAM, SSDs, VRM heatsinks, etc.
They range from a simple heatsink to a water block you connect directly.
While all of these provide some benefits, most components are designed to use the passive airflow inside your case for cooling.
However, if you’re a PC gamer and use a high-end GPU, you might consider installing a fan-equipped expansion card next to your GPU to help move the massive amounts of heat it generates.
Quick Tips to Keep Your Laptop PC Cool
We’re not all Desktop PC users, and many of these suggestions won’t apply to laptop cooling.
But we know you’re out there, so here are a few tips to help keep your laptop running as cool as possible.
How to keep your laptop PC cool
Laptops will run hotter than desktops as they don’t have room to breathe. Plus, every brand and model is different, but many best practices are the same.
Try to keep your laptop between 50-95°C at most. Regularly cleaning the vents will make a big difference, so consider using a cooling pad with built-in fans. They really do help!
My laptop is not my daily driver, but I have an old Sony VAIO that can get a bit toasty on my lap if I use it for a long time.
Also, if your workspace allows, use a laptop stand to lift it off your desk for better airflow, or use a cooling pad, as I mentioned earlier.
Avoid using your laptop on soft surfaces like beds or sofas, as they will likely block some air vents and cause it to heat up quickly.
Frequently Asked Questions
What is the ideal physical placement for a desktop PC case?
The system should be placed in a well-ventilated area away from direct sunlight. If the PC must be on a carpeted floor, it should be placed on a hard board or a stand to make sure the power supply unit (PSU) can draw air through its bottom vents.
How does thermal paste maintenance impact cooling over time?
Thermal paste can degrade over time, especially if the CPU frequently operates at high temperatures. Replacing the paste between the processor and the cooler is cited as a cost-effective hardware maintenance step to restore efficient heat transfer.
What are the primary risks associated with custom water-cooling loops?
While they offer high performance, custom loops involve leak risks due to the numerous manual connections (fittings). They also require significantly more technical knowledge to install and demand regular maintenance, such as coolant changes and internal cleaning.
Final Thoughts on How to Keep Your PC Cool
If you’re building a PC, the two components that generate the most heat and need to be kept coolest are the CPU and GPU (if you’re using one).
In almost every case, it’s the CPU that overheats, affecting overall system performance. Which is why it’s important to understand CPU specs, especially TDP (Thermal Design Power)
Try the options above in order of difficulty, and you might find a quick fix for your overheating issue.
Otherwise, it’s upgrade time. If you’re not comfortable DIY’ing this. Check with your local PC repair shop.
My advice is to avoid the geek counters at those “Big Box Retailers.” See if you have a “Mom and Pop” type shop nearby. Why you ask? First, these independent PC shops tend to be more skilled. Second, their entire business is built on reputation, so they truly value your business and don’t just see you as an opportunity to upsell.




Some helpful info here! How often would you recommend cleaning the dust from a PC to maintain optimal cooling?
There’s no official recommendation. However, if you have a very visual build in what many call a “fish tank” case, you’ll want to clean it more often simply because all the components are so visible. But without that, many say to clean out the dust every 3-6 months. However, if you have pets that shed, I would do it at least every 3 months.
Your point about those old desk style space for a tower PC is so true. I used to keep my tower in the wooden cubby and couldn’t figure out why the fans were always screaming. I cut a hole in the back of the desk and added an exhaust and my temps dropped and everything is running much cooler and quieter!
Many, many years ago, I used to provide in-house support, and you would be surprised how many of my customers had their PC tower right in the “Hot Box”! I was able to convince some to move their PC to a cooler spot, but others really didn’t care as long as it was working, even though I told them performance was likely being affected by thermal throttling.